

'))
Location Elevation Plan Description How to Find Image Gallery
Sima de Cotalbin (K903, K912, K9110)
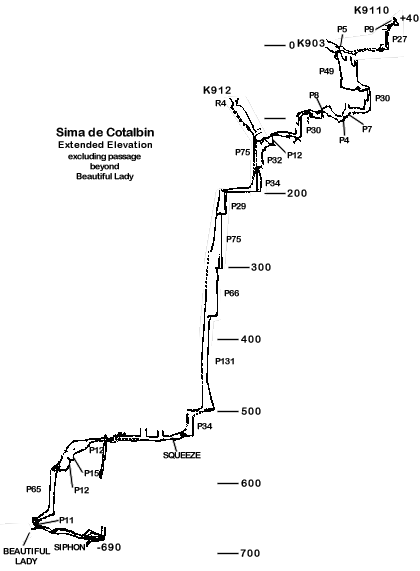
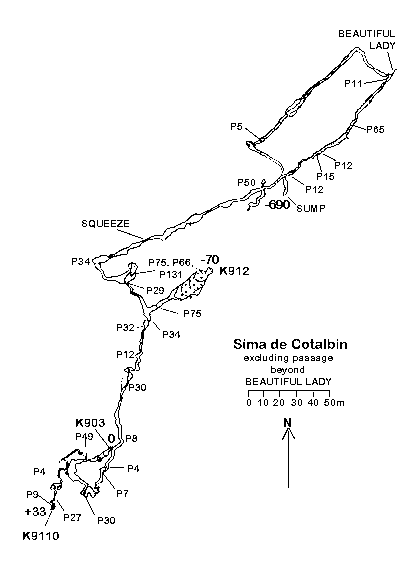
The cave was found and explored by SCP in 1990 to a depth of around 530 m. The following year SCP, YUCPC and SEII worked together to extend this cave. The system now has three entrances - the original being the middle entrance. The lower entrance (K912) significantly promoted exploration in the lower depths. With the new top entrance (K9110) and lower extension the pothole is now approximately 720 m deep.
Location X: 341,41 Y: 4783,99 Z: 1945 m Depth -723 m
Surveys
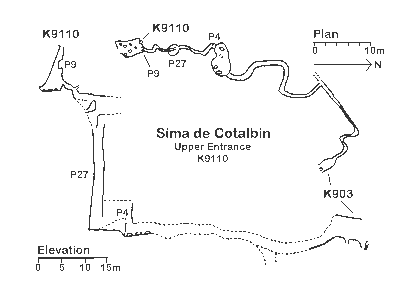
Upper Entrance (K9110) Beyond Beautiful Lady
Description
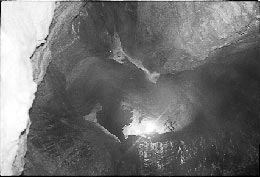
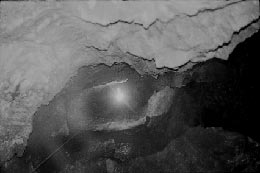
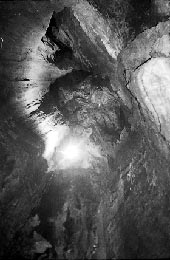
The Upper Entrance Series ― K9110
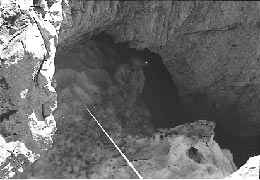
The main entrance is in the side of the ridge. A large oval shaped cave, about two metres at the widest point, drops down via a small ledge to a squarish chamber of three metres width. Along the chamber wall to the right a passage can be seen. Directly opposite the entrance, on the far side of the chamber, an upper entrance enters via a 4 m tube in the roof. This upper entrance can be seen as a small hole in the cliff outside the cave. In the far right hand corner of the chamber below the tube in the roof is a slot which is the main way on.
 This leads to a
narrow descending fissure passing through a very unstable area. This
continues directly to an ever enlarging rift, down which debris from the chamber
above often trundles. At its end a bolt can be found on the wall opposite a
tight rift which offers a good safety line along the rift and down through the
squeeze (cows tails only) to the `floor' 3 m below. Another bolt here preventing
the unwary from descending too far.
This leads to a
narrow descending fissure passing through a very unstable area. This
continues directly to an ever enlarging rift, down which debris from the chamber
above often trundles. At its end a bolt can be found on the wall opposite a
tight rift which offers a good safety line along the rift and down through the
squeeze (cows tails only) to the `floor' 3 m below. Another bolt here preventing
the unwary from descending too far.
A large boulder gives a free hang for the 23 m pitch bolt rebelayed 4½ m below (and down which a cascade of debris from the entrance chamber will occur if care is not taken). At the base a gentle ascent leads into another small boulder floored chamber. A passage then leads out of the chamber before a sharp right to a short slippery free climb down to the bottom of a larger chamber. An attractive helictite can be found back under the climb.
Continuing up slope, the chamber passes into a narrow meandering passage before opening into a much larger passage five metres ahead where an inlet enters. This passage continues to a T-junction with a narrow rift. To the left a five second drop has not yet been investigated and it is not known whether it connects with K903. Traversing (above a four second drop) along the right hand rift for seven metres reaches an ascending passage from where an inlet can be seen at the end of the rift. Following the narrowing passage upwards leads to traverses around the very large holes in the entrance chamber of K903.
Sima de Cotalbin entrance ― K903
An easy, short climb down through the large entrance of K903
 brings you to a sizable chamber.
Belaying to a large boulder, drops down two 5 m dry cascades to a 40 m free hang
near to the wall. This lands in a chamber and bearing left brings you to a
meander and the second pitch. Half way down this 30 m pitch a deviation pulls
you away from the dry cascades – down which
you descend near the bottom. From here a traverse up a ramp takes you to a
series of pitches – the bottom of which is
free climbable. A further ramp leads to an 8 m pitch and following a climb over
boulders a 30 m pitch, with a long traverse line heading to it.
brings you to a sizable chamber.
Belaying to a large boulder, drops down two 5 m dry cascades to a 40 m free hang
near to the wall. This lands in a chamber and bearing left brings you to a
meander and the second pitch. Half way down this 30 m pitch a deviation pulls
you away from the dry cascades – down which
you descend near the bottom. From here a traverse up a ramp takes you to a
series of pitches – the bottom of which is
free climbable. A further ramp leads to an 8 m pitch and following a climb over
boulders a 30 m pitch, with a long traverse line heading to it.
A traverse along a rift leads to the 12 m pitch following. Near the bottom a rebelay to a large block provides an excellent swing to a steep and airy ramp – best lined – to a 32 m pitch, immediately followed by a 34 m pitch gaining a chamber with several aven inlets – where the lower entrance (K912) joins.
The Lower Entrance Series ― K912
 K912 lies ≈ 70 m lower than
K903. The entrance
is hidden by the side wall of the gulley. Climbing this gives a drop onto a 30 m
snow slope. A deviation allows a safe descent down to where the massive passage
bears right to a large arch – rebelayed at
the corner. The
K912 lies ≈ 70 m lower than
K903. The entrance
is hidden by the side wall of the gulley. Climbing this gives a drop onto a 30 m
snow slope. A deviation allows a safe descent down to where the massive passage
bears right to a large arch – rebelayed at
the corner. The
 way on is straight ahead from the base of the snow ramp down a
short scramble to the main 75 m pitch which descending from the top of boulders
is deviated to a narrow rift with two rebelays. The shaft below widens and
two-thirds of the way down a rebelay against the wall gains the floor. Here it
joins the route from K903.
way on is straight ahead from the base of the snow ramp down a
short scramble to the main 75 m pitch which descending from the top of boulders
is deviated to a narrow rift with two rebelays. The shaft below widens and
two-thirds of the way down a rebelay against the wall gains the floor. Here it
joins the route from K903.
Main Shaft Series
 Traversing along the
top of the ramp leads to a short slope (lined) to the head of the free hanging
29 m pitch. At the base, facing the shaft, to the right of the trench a bolt
traverse line leads to the Main Shaft (300 m). A suitable take off with a
Traversing along the
top of the ramp leads to a short slope (lined) to the head of the free hanging
29 m pitch. At the base, facing the shaft, to the right of the trench a bolt
traverse line leads to the Main Shaft (300 m). A suitable take off with a
 Y-hang just over the edge presenting a fine 75 m free hang – near the wall at the bottom. Again to the
right of this ledge (facing outwards) a Y-hang leads to a rebelay just over the
edge. A deviation further down to a cascade and ledge. Again traversing up and
along the right hand wall gains the head of the final large pitch, with three
rebelays followed by the free Y-hanging 120 m descent.
Y-hang just over the edge presenting a fine 75 m free hang – near the wall at the bottom. Again to the
right of this ledge (facing outwards) a Y-hang leads to a rebelay just over the
edge. A deviation further down to a cascade and ledge. Again traversing up and
along the right hand wall gains the head of the final large pitch, with three
rebelays followed by the free Y-hanging 120 m descent.
The Meanders
Walk along the ramp dropping down to a sandy shelf 7 m along and then down to the next pitch of 34 m. Continuing along the top passes over several holes. The pitch head area is extremely brittle – with platelets to the left. The short traverse line leads to a Y-hang with a rebelay half-way down. 7 m along from the bottom a 5 m rope climb up boulders leads to the continuation. Downwards leads back to the stream.
The passage soon widens temporarily before a short squeeze. This is best done by climbing up 1 m and then raising your legs up to pass through horizontally. It is best to take off all gear first (unless you are a very thin French man) and pass it through. Well built people have problems. Two alternatives are possible. Climbing 4 m up into the rift just before the squeeze gains an awkward passage dropping at the wet aven just beyond. The final alternative is a frightening high level traverse starting from the rope climb and dropping back in at the wet aven.
The water drops down through a trench. Following along the top of this – the rift ends at a 2 m climb. Past this an airy traverse in the rift leads to a wet inlet. Following this leads immediately to a 50 m pitch which chokes at the bottom. Just beyond, clambering down steeply leads to a 12 m pitch. Continue along the rift at the bottom until it becomes sensible to drop down to the head of the following 15 m pitch. At the base a ramp rises sharply and at its top another drop leads to the top of the next 12 m pitch. Alternatively – if you're small – go straight through the bottom of the trench.
The pitch descends into a boulder chamber. At its end, climb down 2 m into the meander and crawl out onto a small shelf – the head of the next pitch. This is a series of wet cascades, dropping 65 m with various rebelays and deviations. At the base a short traverse leads to a backup to a Y-hung 11 m pitch.
Upstream from the base follows the rift back to where it becomes too tight. Downstream drops almost immediately 2 m. The stream continues along a 1 m wide hading fissure which is traversed 40 m to a stalagmite floored chamber. Beyond this an inlet stream enters down a small cascade (unexplored) and the passage lowers into a short wet bedding crawl. This deepens into a 15 m deep meander which is followed for 50 m to a wet 8 m climb and small sump pool. A small muddy tube in the roof at the final meander may be followed for 30 m before becoming too tight.
At the bottom of the 2 m drop, if instead of going left you look to the right the draught goes through a small phreatic tube, Beautiful Lady. The tube is about 30 cm high and 60 m wide – into which blows a howling gale. Originally this was dug out through alternate layers of mud and calcite and it is possible that after each Spring melt it might have to be re-dug. The low tube may also become very unpleasant following heavy rains.
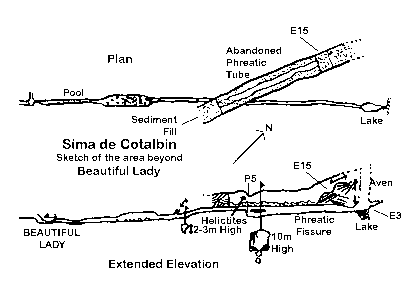 Having passed through
this short phreatic the passage changes to a meander of about 5 m in height with
calcite formations and a draught blowing out of a roof aperture. The floor is of
mud and choss. After 10 m there is a choice of ways on; one continuing as low as
possible into boulders – the other over the
top into the widening rift and into the remains of a 8 m diameter phreatic tube.
The top of the rift emerges at a bend in this passage. To the left is one
completely sediment filled choke with helictites –
possibly gypsum – found near the end.
Straight on over the boulders for 40 m leads to a well decorated part of the
phreatic with inlets coming in from the roof. At the extent of exploration is a
5 m mud climb up the steeply rising layers of mud to a gap of about 2 m at the
top through which the draught blows.
Having passed through
this short phreatic the passage changes to a meander of about 5 m in height with
calcite formations and a draught blowing out of a roof aperture. The floor is of
mud and choss. After 10 m there is a choice of ways on; one continuing as low as
possible into boulders – the other over the
top into the widening rift and into the remains of a 8 m diameter phreatic tube.
The top of the rift emerges at a bend in this passage. To the left is one
completely sediment filled choke with helictites –
possibly gypsum – found near the end.
Straight on over the boulders for 40 m leads to a well decorated part of the
phreatic with inlets coming in from the roof. At the extent of exploration is a
5 m mud climb up the steeply rising layers of mud to a gap of about 2 m at the
top through which the draught blows.
Along the length of this phreatic are ways through the boulders to the vadose trench or rift in the bottom. This follows a fault in the rock as does the phreatic. The rift continues about 10 m under the climb and then dog legs to the left away from the fault. The draught in the trench is lost at this point going up two or more body sized phreatics in the roof at 60º, 4 m above the floor. The passage continues with areas of mud for another 8 m to an area where a lake is found.
A constriction at floor level, 25 cm wide and 1 m high leads onto the lake. The beautiful sea green water is shallow for a few feet, before becoming very deep. The lake widens to 4 m fairly rapidly and the roof rises to an aven. Eight metres across the lake the far wall rises with a short climb into a rift following the same trend as before. Just below the surface and a metre across the lake a block could be used as a stance to bolt over the lake. There is very little draught here.
The passage opposite is a narrow rift – followed in the upper phreatic. This has not been followed to a conclusion – but is thought to be an inlet.
How to Find
From the collapsed hut at Vega Huerta walk past the fuente, over the ridge to the left and into the next gully. Walk down this, past where it widens and bears right to where it widens even further. If you go to far you arrive at a steep `grassy' slope. Bear right to a narrow gully going upwards – to a large cairn at the top. From here follow the contour towards the Cares, paralleling the valley.
When you reach the place where the `path' slopes downwards, K897 is ahead and to the left and K901 is to the right. For K912 – the lower entrance - look ahead to the green grassy hillock. The entrance is situated high up in the right hand wall of the gulley to the right of this hillock - at the end of the hillock.
For both K903 and K9110 – the upper entrance – head upwards from the vantage point towards the very obvious sheep cave until you reach the obvious chasm. Crossing this, head down and across the scree (snow) slope. From the far side head upwards and along until the obvious northwards facing gulley is reached. K903 is the large entrance at its top. To find K9110 continue upwards over the ridge. The entrance lies midway between this ridge and the next.
Bibliography
Top Camp Log Book, YUCPC, 1990 in English.
- Expedicion Picos - 90, SEII, in Spanish.
YUCPC Picos 91, Expedition Report, David Milne (YUCPC) in English.
Expedicion Picos - 91, SEII in Spanish.