

'))
Location Elevation Plan Description Rigging Guide How to Find Image Galleries
Pozo de la Garita Cimera (β47)
β47 3D Line Survey: rotate the image using the mouse.
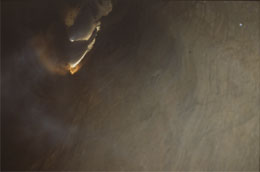
β47 is one of the more difficult caves to descend in this area. It is quite varied, with pitch-ramp sytems, areas of collapse, tight meanders and dry oxbows. It was first found and explored in 1988 by Dave Heatherington and Paul Eastwood. The cave was rapidly pushed down to the base of Hermon Monster Pitch at -317 m. From here, university cavers took over, only to find they were entering an area of tight passages and by the end of the expedition had only gained an extra 39 m depth. In 1991, the club returned to continue exploration of this cave, having run out of easy options. The unexplored pitch was descended to gain a rubble bottomed chamber, Chapel of Rest, with no way on.
Location X: 339,33 Y: 4784,67 Z 1985 m Depth -428 m
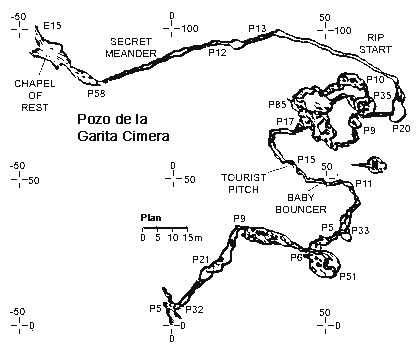
Surveys
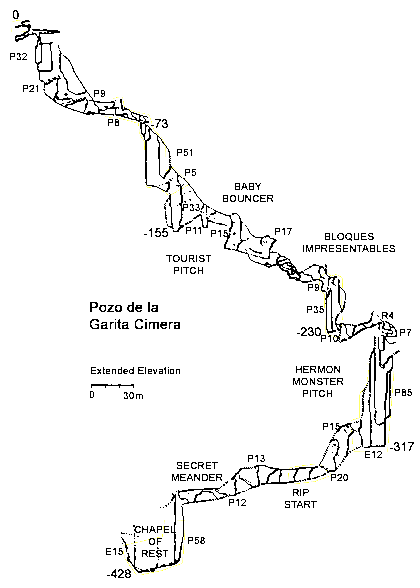
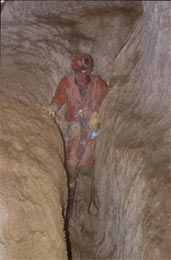
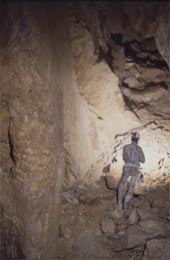
Description
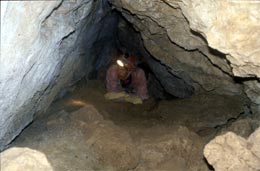
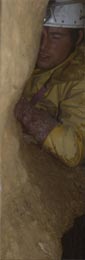
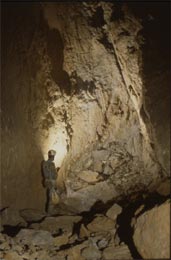
The Entrance Series
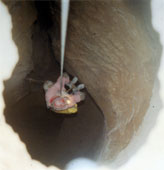
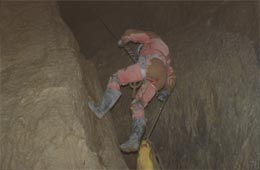
 Sliding sideways through the entrance leads to a
short hands and knees crawl to the first pitch. Slings around boulders give a
Y-hang away from the pitch. A natural deviation supplies a 45º take off followed by a 5 m pitch.
Sliding sideways through the entrance leads to a
short hands and knees crawl to the first pitch. Slings around boulders give a
Y-hang away from the pitch. A natural deviation supplies a 45º take off followed by a 5 m pitch.
To the left, at the bottom, the passage slopes gently downwards. The way on is behind and to the right. Entrance is gained to what appears to be a meander. With the rope attached to a jammed boulder, climb down through awkward blocks to the second pitch. With a sling attached to a jammed boulder, descend 2 m to a spit rebelay. The pitch soon bells out to land on a ledge 20 m down. Traversing up the ramp leads to a stance on poised blocks with an inlet aven to the right. Continuing downwards with a rebelay just below the ledge leads to the base of another ramp. Go down through the trench and up a ramp to the next pitch head.
 A short traverse line leads to a Y-hang, followed shortly by a bolted deviation on
the opposite wall. Descend past a large block, but before reaching the floor,
swing up to the right to a stance on stacked blocks. A spike and spit rebelay,
followed immediately by a deviation to the right, takes you to the floor.
A short traverse line leads to a Y-hang, followed shortly by a bolted deviation on
the opposite wall. Descend past a large block, but before reaching the floor,
swing up to the right to a stance on stacked blocks. A spike and spit rebelay,
followed immediately by a deviation to the right, takes you to the floor.
 Slide between boulders up a ramp turning to the right at the top to gain the forth
pitch. Backed up to a fallen flake, descend at 45º to a rebelay and the pitch
proper into Boulder Chamber.
Slide between boulders up a ramp turning to the right at the top to gain the forth
pitch. Backed up to a fallen flake, descend at 45º to a rebelay and the pitch
proper into Boulder Chamber.
 Down slope leads to a pit. Following the left hand wall up the boulders leads to
a short hands and knees crawl to the fifth pitch. With a boulder as backup,
clamber down over the hole to the false floor. Using the hidden thread as a hang
(the obvious spit below has been placed in choss) descend to a rifty ramp. Head
up this to a short climb down into a small chamber.
Down slope leads to a pit. Following the left hand wall up the boulders leads to
a short hands and knees crawl to the fifth pitch. With a boulder as backup,
clamber down over the hole to the false floor. Using the hidden thread as a hang
(the obvious spit below has been placed in choss) descend to a rifty ramp. Head
up this to a short climb down into a small chamber.
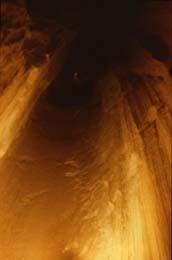
 This is the head of the 50 m pitch. Above the slot between boulder and wall two spits
give a Y-hang. Using a rope protector, slide down through the slot. Ten feet
down a rebelay takes you down a sloping wall of a fine shaft to two bolt
rebelays - the first about 20m down.
This is the head of the 50 m pitch. Above the slot between boulder and wall two spits
give a Y-hang. Using a rope protector, slide down through the slot. Ten feet
down a rebelay takes you down a sloping wall of a fine shaft to two bolt
rebelays - the first about 20m down.
 From the base head down, past the inlet to the left, to the first ramp. Walk down the
trench and up the next ramp to an awkward pitch with bolted Y-hang landing on
another ramp 5 m below. 2 m up the ramp a Y-hang between shattered ledges gains
a fine 33 m pitch. Initially against a sharply
From the base head down, past the inlet to the left, to the first ramp. Walk down the
trench and up the next ramp to an awkward pitch with bolted Y-hang landing on
another ramp 5 m below. 2 m up the ramp a Y-hang between shattered ledges gains
a fine 33 m pitch. Initially against a sharply
 sloping wall, a piton deviation is reached. halfway down a bolt rebelay is located on
the opposite wall. Near to the base, a swing to the left, towards an obvious
ramp, brings you to a large block with sling attached. Clambering up the right
hand side leads to a bolt in the right hand wall for a hand line.
sloping wall, a piton deviation is reached. halfway down a bolt rebelay is located on
the opposite wall. Near to the base, a swing to the left, towards an obvious
ramp, brings you to a large block with sling attached. Clambering up the right
hand side leads to a bolt in the right hand wall for a hand line.
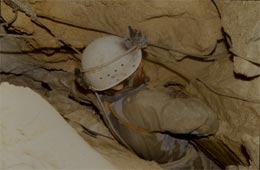
Continue up the ramp – crossing the trench several times. At the top a stallagmite boss gives a good back-up to the pitch. Step out on to the ledge where a spit in the right hand wall and natural spike on the left above give a Y-hang. Half-way down the pitch a swing and clamber to the left (facing the bolt) gives access to the rift Baby Bouncer.
From the Baby Bouncer
Baby Bouncer involves a route at various levels through a rift – marked by carbide from contorted helmets. At the end the rift widens to a short drop from where a sling belay and bolt gives a descent of Tourist Pitch via a deviation on to a ramp. A short ascent leads to further rift. An exposed traverse around a corner leads to a minor constriction followed immediately to the left by Glorious Leader.
A bolt before the constriction gives a traverse line to the pitch head which leads to a Y-hang 2 m below (bolt and natural) leading to a 17 m free-hang – landing in the complex chamber Bloques Impresentables. Looking across the boulder floored chamber, following the left hand wall for 3 m presents a slot through blocks into a circular, domed chamber about 4 m across. Further along the left hand wall a mud/scree slope leads to an inlet.
The way on is to the right, at the cairn. Clambering down several blocks takes you past several dry inlets to a sandy meander. At its end an awkward rift gives access to a 9 m pitch via naturals (rope protector required).
 From
its base a short ramp gains a Y-hang with short traverse line, to a free hanging
35 m pitch. A short way down this pitch a large window can be seen in the far
wall. A swing on to the
From
its base a short ramp gains a Y-hang with short traverse line, to a free hanging
35 m pitch. A short way down this pitch a large window can be seen in the far
wall. A swing on to the
 ledge
below this accesses a short bolted climb to this window. A distant deviation
over a large flake gives a safe descent in Piss Pot. A short climb over calcited rocks leads to an uncomfortable,
unwelcoming crawl ox bowing back into the widened rift leading to the main
pitch. Further down the shaft - and on the wall opposite the above window - two
small windows lead to very muddy rifts paralleling the way on below.
ledge
below this accesses a short bolted climb to this window. A distant deviation
over a large flake gives a safe descent in Piss Pot. A short climb over calcited rocks leads to an uncomfortable,
unwelcoming crawl ox bowing back into the widened rift leading to the main
pitch. Further down the shaft - and on the wall opposite the above window - two
small windows lead to very muddy rifts paralleling the way on below.
A natural thread belay on the ramp following allows a good traverse line for the following 10 m pitch – which lands on a boulder 4 m above the floor. Ascending a steep, muddy ramp then leads to a small chamber and a 4 m handline.
Going upwards from the base of this awkward slot leads to a 7 m pitch with two cracked naturals for back up and a one bolt hang. To get on and off the pitch it is best to enter the rift 2 m below, using a stalagmite deviation to pull the rope in.
 The
exit from the chamber below leads directly to an oxbow - a sloping hole to the
right leading on to the 85 m Hermon Monster Pitch. Using two flakes as
backups, a bolt on the left (facing up the slope) gives a hang rebelayed 6 m
down. A short distance below this rebelay an obvious ramp leaves the main
shaft, providing an inlet shaft that rejoins near the base of the 85 m pitch.
Continuing down lands on an inlet ledge which gives an opportunity for
The
exit from the chamber below leads directly to an oxbow - a sloping hole to the
right leading on to the 85 m Hermon Monster Pitch. Using two flakes as
backups, a bolt on the left (facing up the slope) gives a hang rebelayed 6 m
down. A short distance below this rebelay an obvious ramp leaves the main
shaft, providing an inlet shaft that rejoins near the base of the 85 m pitch.
Continuing down lands on an inlet ledge which gives an opportunity for
 a
rebelay and descent close to the wall.
a
rebelay and descent close to the wall.
The base of the shaft is blind. A 12 m permanent rope enables you to climb up to the exit ramp. A short traverse and 2 m climb leads to a narrow rift which then opens up. A Y-hang rigged through an awkward slot leads to a 15 m pitch followed by a 20 m pitch to a pleasant stance on a ramp.
The Meanders
 From
the obvious resting place a 2 m drop into a narrow rift leads quickly to the
beginning of Rip Start. Crawling over an obstruction immediately leads to
a standing rift along which very slow sideways movement is advised - moving
backwards each time anything gets caught on the sharp calcite nodules. A hammer
is a useful device for venting your annoyance. Occasionally a bit of involved
crawling is necessary.
From
the obvious resting place a 2 m drop into a narrow rift leads quickly to the
beginning of Rip Start. Crawling over an obstruction immediately leads to
a standing rift along which very slow sideways movement is advised - moving
backwards each time anything gets caught on the sharp calcite nodules. A hammer
is a useful device for venting your annoyance. Occasionally a bit of involved
crawling is necessary.
At the end, a traverse through an awkward slot and over The Coffin Lid leads to a sloping descent over choss to the head of the next pitch of 15 m. Descent is from a one bolt flyer backed by a large natural. An optional deviation doesn't help remove rub points but stops the worst. Down slope at the base leads to a pool; upslope to the penultimate pitch of 12 m – again via a very loose rift. This pitch hades, but a tenuous natural deviation prevents rub points.
Ascending the slope leads to a 2 m climb and Secret Meander. This level in the rift - the original phreatic – follows a fault and is very straight – but the rift below breaks into a winding meander. Sliding past the first block leads to wider, stooping passage. A traverse over large fallen blocks is the continuation. Dropping between the blocks is too tight. Continuing, the way becomes smaller – coming shortly to a crawl. Mastectomy Squeeze – named after being hammered – acts as the backup to the final pitch. This squeeze was the limit of the 1988 exploration.
 The
58 m pitch – Twenty-five Metre Pitch – uses a
mixture of rawlbolts and spits. A bolt to the left, just past the squeeze starts
the traverse. In many places the hading wall to right is very loose. The main
hang drops to the mud ledge below and with a rope protector over its edge leads
to a rebelay. Below, a bolted deviation takes you to a sloping ledge.
To the left a 45º boulder descent
The
58 m pitch – Twenty-five Metre Pitch – uses a
mixture of rawlbolts and spits. A bolt to the left, just past the squeeze starts
the traverse. In many places the hading wall to right is very loose. The main
hang drops to the mud ledge below and with a rope protector over its edge leads
to a rebelay. Below, a bolted deviation takes you to a sloping ledge.
To the left a 45º boulder descent
 leads to a 4 m climb down to where the rift becomes too tight. To the right a bolt
leads to a rebelay 4 m below. The pitch lands in a massive chamber –
Chapel of Rest. This slopes downwards over mud and scree at about 30º to
two inlets – a wet aven to the left and Choke Dave to the right. A bolt climb up the choke for 15 m and free climb
to the roof didn't yield a way on – despite a strong draught into the main
chamber at the base. Near the waterfall a draughting hole was partially dug – with a too small gap at the end – next rock supported the massive block
above. Looking down slope from the pitch a dry cascade comes in from the right -
no draught.
leads to a 4 m climb down to where the rift becomes too tight. To the right a bolt
leads to a rebelay 4 m below. The pitch lands in a massive chamber –
Chapel of Rest. This slopes downwards over mud and scree at about 30º to
two inlets – a wet aven to the left and Choke Dave to the right. A bolt climb up the choke for 15 m and free climb
to the roof didn't yield a way on – despite a strong draught into the main
chamber at the base. Near the waterfall a draughting hole was partially dug – with a too small gap at the end – next rock supported the massive block
above. Looking down slope from the pitch a dry cascade comes in from the right -
no draught.
Rigging Guide
| Pitch No. | Name | Height (m) | Rope Length (m) | Slings | Deviation Crabs | Bolts | Rope Protectors |
| 1 | P5 | 65 | 3 | 1 | |||
| 2 | P32 | 3 | 1 | 3 | |||
| 3 | P21 | 30 | 3 | 2 | 5 | ||
| 4 | P9 | 20 | 1 | 2 | |||
| 5 | P6 | 11 | 2 | ||||
| 6 | P51 | 60 | 6 | 1 | |||
| 7 | P5 | 10 | 2 | ||||
| 8 | P33 | 50 | 2 | 1 | 4 | ||
| 9 | P11 | 15 | 3 | 1 | |||
| 10 | Tourist Pitch | P15 | 30 | 2 | 1 | 1 | |
| 11 | Glorious Leader | P17 | 30 | 1 | 3 | ||
| 12 | P9 | 15 | 1 | 1 | 1 | ||
| 13 | P35 | 45 | 3 | ||||
| 14 | P10 | 25 | 2 | 3 | |||
| 15 | R4 | 10 | 2 | ||||
| 16 | P7 | 15 | 3 | 1 | 1 | ||
| 17 | Hermon Monster Pitch | P85 | 100 | 2 | 4 | ||
| 18 | E12 | 20 | 2 | 1 | |||
| 19 | P15 | 55 | 2 | 2 | |||
| 20 | P20 | 3 | |||||
| 21 | P13 | 20 | 2 | 1 | 1 | ||
| 22 | P12 | 25 | 2 | 1 | 2 | ||
| 23 | Twenty-five Metre Pitch | P58 | 70 | 1 | 1 | 7 | 1 |
How to Find
 From the collapsed refugio at Vega Huerta head west, below the main path towards
Vegaredonda; down valley. On the right the ground widens to form a semicircular
slope.
From the collapsed refugio at Vega Huerta head west, below the main path towards
Vegaredonda; down valley. On the right the ground widens to form a semicircular
slope.
 Straight ahead a boulder and scree strewn (or snow filled) gully slopes
down towards you across the other side. Head for this maintaining your height
and walk to the top of the gully. At its head β6
is to the left.
Straight ahead a boulder and scree strewn (or snow filled) gully slopes
down towards you across the other side. Head for this maintaining your height
and walk to the top of the gully. At its head β6
is to the left.
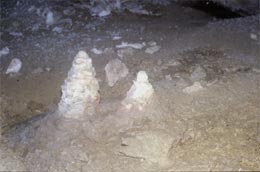
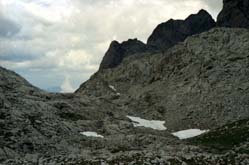
Scramble up and to the right to the top 20 m ahead. Below is a large doline. Ahead the left hand peak is the Garita Cimera. Walk down into the depression towards this peak. Near the bottom a limestone bulge, topped by several cairns, situated next to a gully, is reached. A cleft on the far side of this bulge contains the entrance to β47.
Bibliography
Kaos de Bloques, Dec 1989, No 3, SEG in Spanish.
YUCPC Picos 91, Expedition Report, David Milne (YUCPC) in English.
Top Camp Log Book, YUCPC, 1991 in English.
Expedicion Picos - 91, SEII in Spanish.